Tutorials to set up wallet:
MetaMask is a cryptocurrency wallet used to interact with the Ethereum/Polygon blockchain. It can be accessed through an app or through a browser extension.
For best experience, open on Google Chrome Desktop Browser
Step 1:
Download MetaMask wallet Go to https://metamask.io/ and click on “Download”. Choose your preferred browser or mobile application and install the MetaMask extension. MetaMask supports iOS, Android native apps along with Chrome, Firefox, Brave and Edge browser extensions.

Step 2:
MetaMask wallet installation Click on the MetaMask extension and click on “Get Started”. You can either import an existent wallet using the seed phrase or create a new one.

Step 3:
How to create a new MetaMask wallet Click on “Create a Wallet” and on the next window click on “I agree” if you would like to help improve MetaMask or click on “No Thanks” to proceed.


Step 4:
Create a strong password for your wallet.

Step 5:
Securely store the seed phrase for your wallet Click on “Click here to reveal secret words” to show the seed phrase. MetaMask requires that you store your seed phrase in a safe place. It is the only way to recover your funds should your device crash or your browser reset. We recommend you write it down. The most common method is to write your 12-word phrase on a piece of paper and store it safely in a place where only you have access. Note: if you lose your seed phrase, MetaMask can’t help you recover your wallet and your funds will be lost forever. Never share your seed phrase or your private key to anyone or any site, unless you want them to have full control over your funds.
Click on “Next”.

Step 6:
Seed phrase confirmation Confirm your secret backup phrase by clicking on each word in the order in which the words were presented on the previous screen. Click on “Confirm” to proceed.

Congratulations! Your MetaMask wallet has been set up successfully. You can now access your wallet by clicking on the MetaMask icon at the top-right-end corner of your preferred browser.

Step 7:
To make MetaMask easy to access, you can pin it to your Chrome browser by clicking the puzzle icon and pinning MetaMask to the toolbar. After the initial setup, MetaMask will only be connected to Ethereum. Next, we will see how to connect Metamask to Polygon.

Step 8:
Adding Polygon support to your wallet involves adding some network details to the extension. First, open MetaMask and click the network dropdown menu.

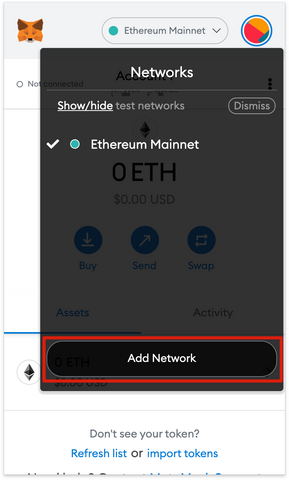
Step 9:
Now, click [Add Network] on the pop-up.
Step 10:
You’ll need to add the following details on the [Add a network] page that will open. Click [Save] when you’re finished.
Network Name : Polygon
New RPC URL
Choose any of the following:
https://polygon-rpc.com
https://rpc-mainnet.maticvigil.com
https://rpc-mainnet.matic.network
https://rpc-mainnet.matic.quiknode.pro
Chain ID : 137
Currency Symbol : MATIC
Block Explorer URL : https://polygonscan.com/

Step 11:
Click on the Account and copy the wallet address and send it to us:
